How To Set Up a Firewall Using Iptables
Set Up a Firewall Using Iptables
Introduction
Setting up a good firewall is an essential step to take in securing any modern operating system. Most Linux distributions ship with a few different firewall tools that we can use to configure our firewalls. In this guide, we’ll be covering the iptables firewall. Iptables is a standard firewall included in most Linux distributions by default (a modern variant called nftables will begin to replace it). It is actually a front end to the kernel-level netfilter hooks that can manipulate the Linux network stack. It works by matching each packet that crosses the networking interface against a set of rules to decide what to do. In the previous uide, we learned how iptables rules work to block unwanted traffic. In this guide, we’ll move on to a practical example to demonstrate how to create a basic rule set for an Ubuntu 14.04 server. The resulting firewall will allow SSH and HTTP traffic.
Note: This tutorial covers IPv4 security. In Linux, IPv6 security is maintained separately from IPv4. For example, “iptables” only maintains firewall rules for IPv4 addresses, but it has an IPv6 counterpart called “ip6tables”, which can be used to maintain firewall rules for IPv6 network addresses. If your VPS is configured for IPv6, please remember to secure both your IPv4 and IPv6 network interfaces with the appropriate tools. For more information about IPv6 tools, refer to this guide: How To Configure Tools to Use IPv6 on a Linux VPS
Prerequisites
Before you start using this tutorial, you should have a separate, non-root superuser account—a user with sudo privileges—set up on your server. If you need to set this up, follow this guide. Initial Server Setup with Ubuntu 14.04.
Basic iptables Commands
Now that you have a good understanding of iptables concepts, we should cover the basic commands that will be used to form complex rule sets and to manage the iptables interface in general. First, you should be aware that iptables commands must be run with root privileges. This means that you need to log in as root, use su or sudo -i to gain a root shell, or precede all commands with sudo. We are going to use sudo in this guide since that is the preferred method on an Ubuntu system. A good starting point is to list the current rules that are configured for iptables. You can do that with the -L flag: A good starting point is to list the current rules that are configured for iptables. You can do that with the -L flag:
- sudo iptables -L
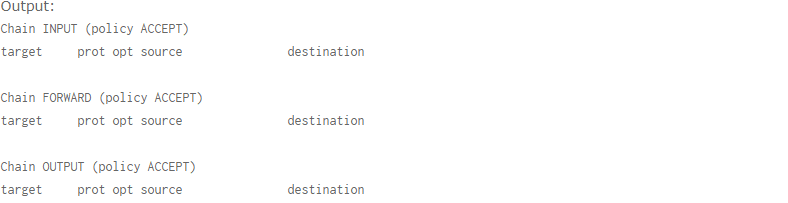
We can see the output in a format that reflects the commands necessary to enable each rule and policy by instead using the -S flag: As you can see, we have our three default chains (INPUT, OUTPUT, and FORWARD). We also can see each chain’s default policy (each chain has ACCEPT as its default policy). We also see some column headers, but we don’t see any actual rules. This is because Ubuntu doesn’t ship with a default rule set.
- sudo iptables -S

To replicate the configuration, we’d just need to type sudo iptables followed by each of the lines in the output. (Depending on the configuration, it may actually be slightly more complicated if we are connected remotely so that we don’t institute a default drop policy before the rules are in place to catch and allow our current connection.) If you do have rules in place and wish to scrap them and start over, you can flush the current rules by typing:
- sudo iptables -F
Once again, the default policy is important here, because, while all of the rules are deleted from your chains, the default policy will not change with this command. That means that if you are connected remotely, you should ensure that the default policy on your INPUT and OUTPUT chains are set to ACCEPT prior to flushing your rules. You can do this by typing:
- sudo iptables -P INPUT ACCEPT
- sudo iptables -P OUTPUT ACCEPT
- sudo iptables -F
You can then change the default drop policy back to DROP after you’ve established rules that explicitly allow your connection. We’ll go over how to do that in a moment.
Make your First Rule
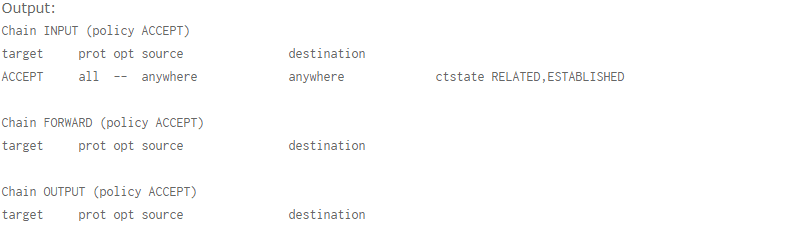
We’re going to start to build our firewall policies. As we said above, we’re going to be working with the INPUT chain since that is the funnel that incoming traffic will be sent. We are going to start with the rule that we’ve talked about a bit above: the rule that explicitly accepts your current SSH connection. The full rule we need is this:
- sudo iptables -A INPUT -m conntrack –ctstate ESTABLISHED, RELATED -j ACCEPT
- -A INPUT: The -A flag appends a rule to the end of a chain. This is the portion of the command that tells iptables that we wish to add a new rule, that we want that rule added to the end of the chain, and that the chain we want to operate on is the INPUT chain.
- -m conntrack: iptables has a set of core functionality, but also has a set of extensions or modules that provide extra capabilities.
- –ctstate: This is one of the commands made available by calling the conntrack module. This command allows us to match packets based on how they are related to packets we’ve seen before.
- -j ACCEPT: This specifies the target of matching packets. Here, we tell iptables that packets that match the preceding criteria should be accepted and allowed through.
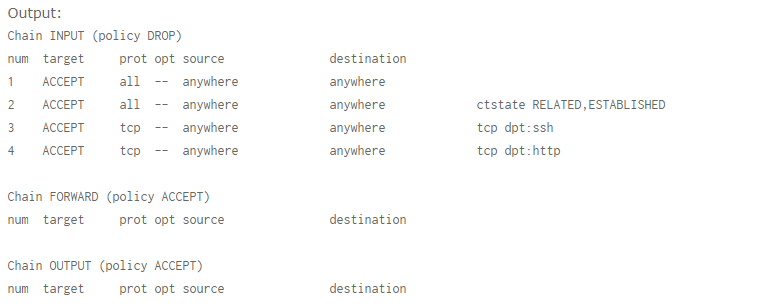
- sudo iptables -L
Now that you know the general syntax, let’s continue by adding some more cases where we want to accept the connection.
Accept Other Necessary Connections
We have told iptables to keep open any connections that are already open and to allow new connections related to those connections. However, we need to create some rules to establish when we want to accept new connections that don’t meet those criteria. We want to keep two ports open specifically. We want to keep our SSH port open (we’re going to assume in this guide that this is the default 22. If you’ve changed this in your SSH configuration, modify your value here). We are also going to assume that this computer is running a web server on the default port 80. If this is not the case for you, you don’t have to add that rule.
The two lines we’re going to use to add these rules are:
- sudo iptables -A INPUT -p TCP –dport 22 -j ACCEPT
- sudo iptables -A INPUT -p TCP –dport 80 -j ACCEPT
- -p TCP: This option matches packets if the protocol being used is TCP. This is a connection-based protocol that will be used by most applications because it allows for reliable communication.
- –dport: This option is available if the -p TCP flag is given. It gives a further requirement of matching the destination port for the matching packet. The first rule matches TCP packets destined for port 22, while the second rule matches TCP traffic pointed toward port 80.
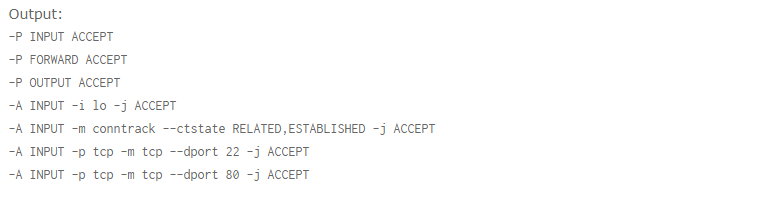
- sudo iptables -I INPUT 1 -i lo -j ACCEPT
- -I INPUT 1: The -I flag tells iptables to insert a rule. This is different than the -A flag which appends a rule to the end. The -I flag takes a chain and the rule position where you want to insert the new rule.
- -i lo: This component of the rule matches if the interface that the packet is using is the “lo” interface. The “lo” interface is another name for the loopback device. This means that any packet using that interface to communicate (packets generated on our server, for our server) should be accepted.
- sudo iptables -S
Implementing a Drop Rule
We now have four separate rules that explicitly accept packets based on certain criteria. However, our firewall currently is not blocking anything. If a packet enters the INPUT chain and doesn’t match one of the four rules that we made, it is being passed to our default policy, which is to accept the packet anyways. We need to change this. There are two different ways that we can do this, with some pretty important differences. The first way we could do this is to modify the default policy of our INPUT chain. We can do this by typing:
- sudo iptables -A INPUT -p TCP –dport 22 -j ACCEPT
- sudo iptables -A INPUT -p TCP –dport 80 -j ACCEPT
- sudo iptables -P INPUT DROP
- sudo iptables -P INPUT ACCEPT
- sudo iptables -A INPUT -j DROP
- sudo iptables -D INPUT -j DROP
- sudo iptables -A INPUT new_rule_here
- sudo iptables -A INPUT -j DROP
- sudo iptables -I INPUT 4 new_rule_here
- sudo iptables -L –line-numbers
This can be helpful to make sure you are adding your rule at the appropriate position.
Listing and Deleting Iptables Rules
If you want to learn the details about listing and deleting iptables rules, check out this tutorial: How To List and Delete Iptables Firewall Rules.
Saving your Iptables Configuration
By default, the rules that you add to iptables are ephemeral. This means that when you restart your server, your iptables rules will be gone. This is actually a feature for some users because it givesthem an avenue to get back in if they have accidentally locked themselves out of the server. However, most users will want a way to automatically save the rules you have created and load them when the server starts. There are a few ways to do this, but the easiest way is with the iptables-persistent package. You can download this from Ubuntu’s default repositories:
- sudo apt-get update
- sudo apt-get install iptables-persistent
Saving Updates
If you ever update your firewall and want to preserve the changes, you must save your iptables rules for them to be persistent. Save your firewall rules with this command:
- sudo invoke-rc.d iptables-persistent save
Conclusion
You should now have a good starting point for developing a firewall that addresses your needs. There are many other firewall utilities and some that may be easier, but iptables is a good learning tool, if only because it exposes some of the underlying netfilter structures and because it is present in so many systems. To learn more about securing your network with iptables, check out these tutorials:
- How To Implement a Basic Firewall Template with Iptables on Ubuntu 14.04
- Iptables Essentials: Common Firewall Rules and Commands
- How To Set Up an Iptables Firewall to Protect Traffic Between your Servers
- A Deep Dive into Iptables and Netfilter Architecture
- How To Test your Firewall Configuration with Nmap and TCPdump
Collection and compilation: Dezhafzarnet Company
ContactUs
Dezhfarenet SocialNetworks
You can contact us through the following networks, I will respond as soon as possible